Introduction
Taking your Flutter app from code to the Apple App Store in 2024 is an exciting milestone for any developer. With Flutter's ability to create beautiful, high-performance apps from a single codebase, reaching iOS users has never been easier. However, navigating the App Store's submission process requires careful preparation and adherence to Apple’s guidelines. This blog will walk you through the essential steps, from setting up your app for iOS to successfully publishing it on the App Store, ensuring your app meets all requirements and stands out in a competitive market.
To publish a Flutter app to the Apple App Store in 2024, follow these steps, which include preparing your app, setting up necessary configurations, and managing the submission process via Xcode and App Store Connect.
1. Prepare Your App
Test Your App: Ensure your Flutter app runs smoothly on iOS devices by testing thoroughly. Use real devices via Xcode or simulators.
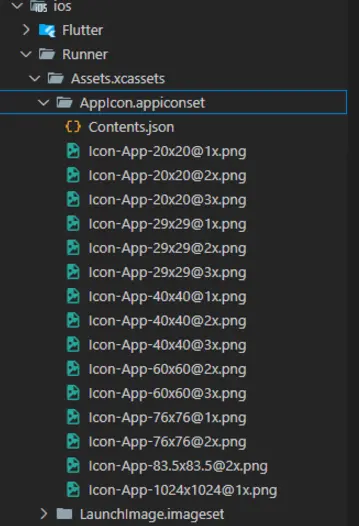
App Icons: Create an App Icon with multiple dimensions (ios/Runner/Assets.xcassets/AppIcon.appiconset directory)
App Permissions: Ensure your Info.plist includes the necessary permissions for features like camera, location, or notifications.
Bundle Identifier: Ensure your app's bundle identifier is unique. This is set in Xcode under Runner > General > Bundle Identifier (e.g., com.yourcompany.yourapp ).
2. Set Up Developer Account
Enroll in the Apple Developer Program:
Go to the Apple Developer website and enroll as an individual or an organization. The cost is $99/year.
Create Certificates and Profiles:
Go to the Apple Developer portal and create an iOS Distribution Certificate and a Provisioning Profile for your app. Alternatively, Xcode can automatically manage this for you.
iOS Distribution Certificate & Provisioning Profile
An iOS Distribution Certificate is a digital certificate provided by Apple that verifies your identity as a developer and allows you to sign your app for distribution on the App Store.
A Provisioning Profile links your app’s bundle identifier with the distribution certificate, ensuring that the app is properly signed and authorized to run on target devices. The distribution certificate is used to sign the app during the build process, while the provisioning profile is required for submitting the app to the App Store or distributing it through other methods like TestFlight. Both are essential for successfully deploying iOS apps.
3. Configure Xcode for iOS
Open Your Project in Xcode:
Run the command to open the iOS part of your Flutter app in Xcode: open.ios/Runner.xcworkspace
Select a Team:
In Xcode, go to Runner > Signing & Capabilities.
Under Signing, select your Apple Development Team.
Xcode will automatically generate a development provisioning profile.
Set the App Version and Build Number:
In General > Identity, update the app version (e.g., 1.0.0) and build number (increment this for each release).
4. Build for iOS Release
Configure Release Model:
Ensure your Flutter app is set for release mode by running: flutter build ios --release
Archive the App in Xcode:
- In Xcode, select Product > Scheme > Runner.
- Then, go to Product > Archive. Xcode will build and archive your app.
- Once the archive process completes, the Organizer window will appear.
5. Upload the App to App Store Connect
App Store Connect:
- Go to App Store Connect and create a new app record under My Apps.
- Enter your app details, including the name, bundle ID, SKU, and app category.
- Prepare your app’s privacy policy URL, app icon (1024 x 1024 px), and app screenshots.
Upload from Xcode:
- In the Organizer window, select your app archive and click Distribute App.
- Choose the App Store Connect distribution method.
- Follow the prompts to validate your app and upload it to App Store Connect.
6. Prepare for submission
Complete App Store Listing: In App Store Connect, fill out your app’s details:
App Information: Provide your app name, description, keywords, support URL, and marketing URL.
App Icon & Screenshots: Upload app screenshots for various device sizes (iPhone, iPad, etc.).
Privacy Policy: Provide a URL to your privacy policy.
Pricing & Availability: Set your app’s pricing model (free or paid) and the countries where it will be available.
7. Submit for Review
App Store Review Information:
Provide contact information and any notes the App Review team might need.
Set up TestFlight for beta testing if needed.
Submit to Review:
Once all details are completed, you can submit your app for review by clicking Submit for Review. Apple’s review process can take a few days to a week or more, depending on the app's complexity and Apple's current review queue.
8. App Approval and Release
Once Apple reviews and approves your app, you will be notified via email.
You can choose to either automatically release the app or manually release it after approval.
9. Monitor Performance and Updates
App Analytics:
Use App Store Connect to track your app’s performance, including downloads, user engagement, and crash reports.
Submit App Updates:
For future updates, increment the build number and version in Xcode, then archive and upload a new build following the same process.
Conclusion
Publishing your Flutter app on the Apple App Store in 2024 is a rewarding journey that showcases your creativity and technical expertise. By following the outlined steps, from development and testing to meeting Apple’s rigorous guidelines, you ensure your app is ready to delight users worldwide. The App Store offers tremendous opportunities for growth, engagement, and monetization, making it a vital platform for developers. As you embark on this journey, remember to keep your app updated and user-focused to achieve sustained success in the ever-evolving iOS ecosystem.

Leave a comment
Your email address will not be published. Required fields are marked *


© 2025 EC Group. All rights reserved.